March 2001
3 Dolls and Bonus Butterfly Calendar Card
Designed By Judi Kauffman

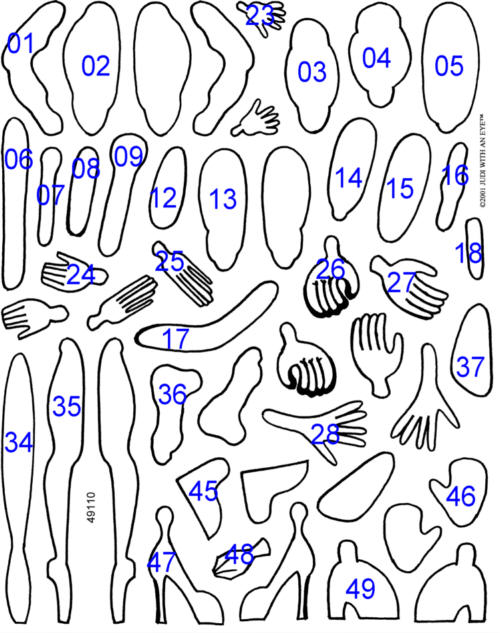
The JK Doll Kit includes three sheets of outline stamps that can be used for
thousands of combinations including dolls, animals, fantasy figures, and
more. Even though they have been named for easy identification, all of the
stamps can be turned into something other than what you might think they are
at first glance. For example, the head with a bob-style hairdo looks like a
fish when it's turned sideways.
One way to have fun with the shapes is to stamp a lot of pieces on plain
white card stock, cut them out, and play with them -- turning shapes upside
down and sideways as well as in traditional ways, combining the pieces
several times before completing a project.
Click here to the samples
I made using this playful method. Use them for inspiration or
stamp the shapes listed to duplicate the combination.
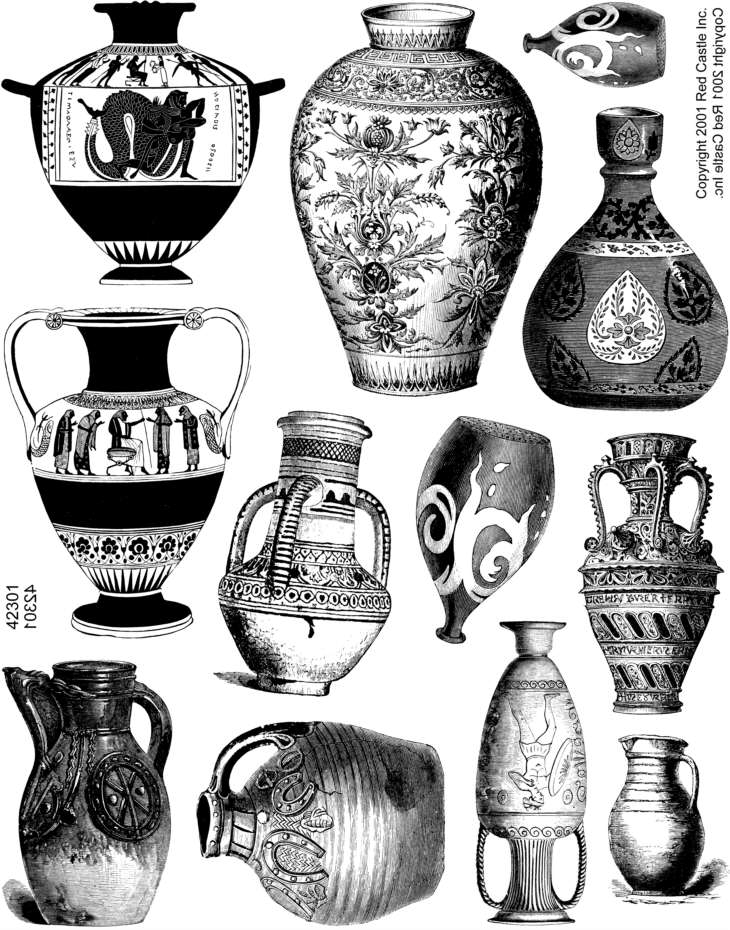
It's also fun to add other stamps into the mix. Two of the dolls featured
for this month's project have VASE stamps for their bodies. Look at your
stamp collection and you'll find lots of possibilities. Leaves, pods,
geometric shapes, and other images make excellent bodies, wings, heads and
more.
This month's projects have minimal embellishment because I wanted the first
JK Doll Kit projects to be easy and fast. You can add wire, beads, dried
flowers, collage or anything else you want. If you want moving joints, use
brads, eyelets, Becky Zec's wire coils (
click here to see), buttons
or cord. Your creations can be made of shrink plastic, card stock, leather
-- or you can add a seam allowance for sewn and stuffed versions. In other
words -- the possibilities are endless!
I hope that these stamps give you many years of pleasure, and that you will
enjoy them with family, friends, and children of all ages.
MATERIALS
- JK Doll Kit #49101, #49111, #49121
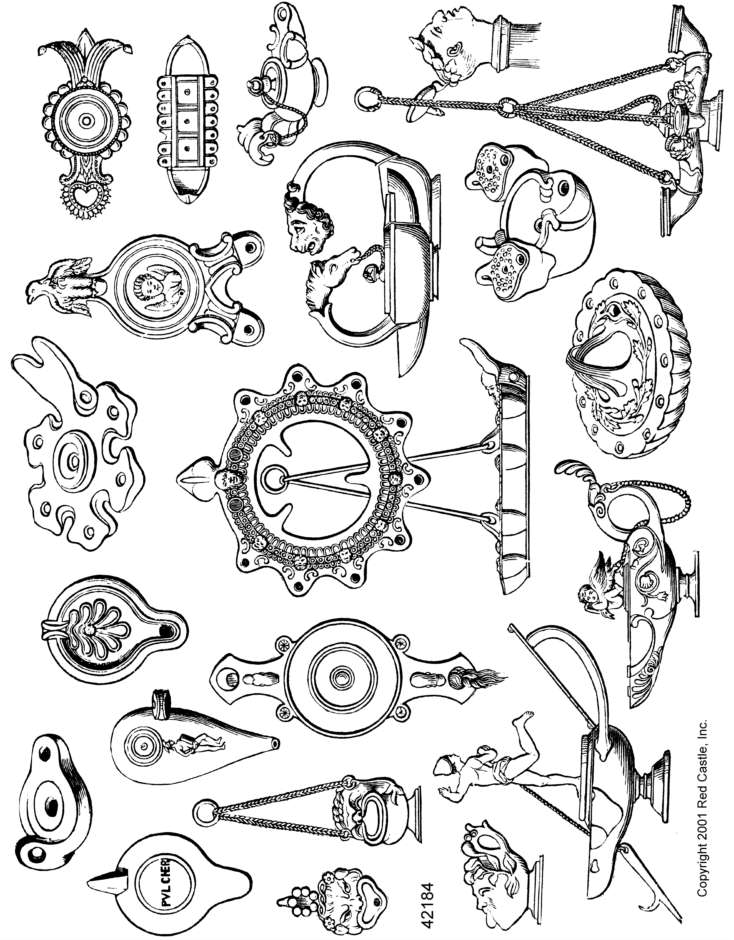
- 42184 Lamps from Pompeii (Hero Doll)
- 42301 Vases Sheet 1 (Vase Body Dolls)
- Ranger Big & Juicy Rainbow ink pads or dye ink of your choice
- Markers, colored pencils
- Gel Xtreme pens - Gold, copper, white, pink, purple
- Brads, eyelets, wire, dimensional embellishments (optional)
- Stamp positioner (optional but useful if you wood mount your stamps)
- Card stock (shown - white, blue, black and purple)
- Glue
- Lightweight paper for practice
Instructions
General Instructions
-
Practice stamping on lightweight paper. It takes a little while to get the
eyes, lips and other elements in the right place. For exact placement use a
stamp positioner.
-
If you prefer to stamp onto the shapes before cutting out card stock pieces,
leave plenty of room between them. Some people prefer to cut out the pieces
first because it uses less stock. This is a personal preference -- there are
no rules.
Hero Doll
- Stamp on white card stock:
- Head C
- Torso P (widest area at the top for shoulders)
- Left and right for the following
- Arms 01
- Hands 27
- Thighs 02
- Calves 13
- Feet 45
-
Stamp extra pieces on lightweight paper. Practice selecting and positioning
portions of lamps for moustache and hat, shoes, necklace, tattoos and
jewelry. Practice stamping eyes in right position, (eye stamp is just below
#61 wings on Add-Ons sheet).
-
IMPORTANT HINT: If you have trouble positioning any elements, you can always
stamp them on a separate piece of card stock, cut them out and glue them in
place (for example, the eyes or the shoulder tattoos). This is easiest on
large or simple shapes.
-
Cut out card stock pieces, stamp as shown or as you prefer. Color with
pencils, markers or gel pens.
-
Glue pieces together at wrist, knee and ankle, overlapping as shown. These
joints will not bend. Use brads at shoulders, neck and upper legs for
movable joints.
-
Use computer type or hand write "You Are My Hero" message. Add the figure to
a card or tuck him into a gift box or stand him on your hero's desk or night
table.
-
Options:
- Make your figure look like he's wearing a long sleeve shirt by omitting
tattoos on arms and use the same color for torso and arms.
- Color the shoes to look like sneakers instead of using decorative sections
of lamp stamp -- add thread for shoelaces.
- Make a Heroine Doll by selecting different templates and embellishments.
|

|
Funky Vase Girl
-
Stamp on white card stock:
- Greek vase with handles
- Left and right hands 28
- Two eyes (same as earrings for Red-Haired Doll) to use for feet
- Cluster of curly hair (same as hair for Red-Haired Doll)
Option: Instead of cutting out pieces, everything can be stamped at once by
using masks
-
Cut out pieces. Stamp eyes and mouth at neck of vase. Stamp hands with a
section of a vase for extra decoration.
-
Color handles of vase, feet, eyes and mouth with gel pens. Lightly add
colored pencil shading on vase.
-
Glue pieces together as shown.
-
Options:
- Choose a different vase and add stamped pieces or wire for arms if there are
no handles.
- Add yarn, beads or other dimensional embellishment.
- Choose a different color combination or emboss the vase.
|

|
Red-Haired Vase Doll
-
Stamp on white card stock:
- Head A
- Large Vase
- Small Vase
- Curly hair cluster (bottom left stamp on Add-Ons sheet)
- Earring (eye stamp is just above beak #71 on Add-Ons sheet)
- Stamp on Purple card stock:
- Two arms 17
- Left and right legs 35
- Left and right hands 24
-
Stamp eye as shown (use 1/2 of long eye that is to the left of #66 butterfly
wing on Add-Ons sheet). Stamp arms and legs with sections of the vase
(denser pattern on legs).
-
Cut out all parts. Use colored pencils to color hair, cheek, eye, and just
inside the top of the large vase. Use gel pens to color earring and
embellish small vase.
-
Cut a slit at the top of the front edge of large vase. Insert neck as shown.
Glue all parts to card front. Note how hands turn to hold vase (this detail
is important). Add gel pen bracelet and rings to hands after glue dries.
Glue leaves or a flower at top of small vase.
-
Options:
- Make a jointed doll with movable arms and legs. Doll can hold a vase or
something else.
- Use real beads for rings, bracelet and earrings.
- Change hair color to look like the recipient of the doll.
|

|

Bonus Butterfly Card
By Judi Kauffman
This project combines the FREE Red Castle
Calendar Software and JK Doll
Stamps. The message at the bottom says "Just Five More Months till Your
Wedding" -- but the calendar "concept" would work for any event that requires
waiting and anticipation:
- Graduation
- Prom
- Retirement
- Christmas
- Birthday (turning 40, 50, 80)
Instead of using them for a calendar card, they would work well for one that
says "Thinking of You" or "Happy Birthday". Make them white on white for a
wedding or anniversary. Use shrink plastic for earrings or pins. Make them
from sturdy card stock, attach them to magnets and let them flutter across
your file cabinet or refrigerator.
Materials:
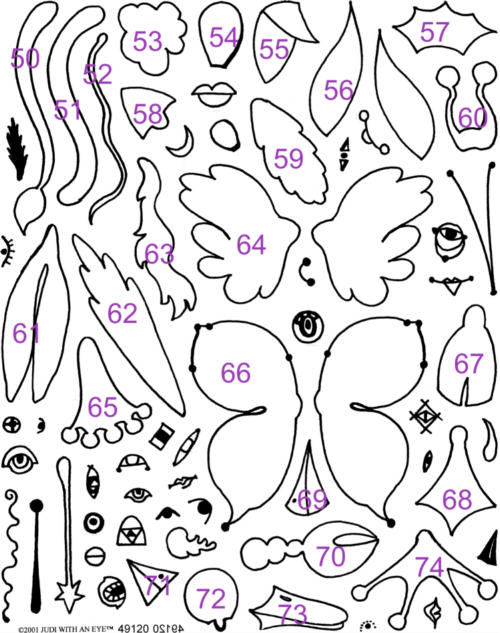
- JK Doll Kit stamps #09 arm (for butterfly body) and #66 wings, antennae from
Add-Ons sheet
- Tactile Impressions stamps (any pattern you like, as shown: #49080 - oval
lace motif, and #49070 overall pattern for mosaic squares)
- Gold pigment ink
- Gold embossing powder
- Ranger Big & Juicy Rainbow ink pad - Hydrangea
- Card stock - black, reddish brown, gold
- Handmade paper with embedded leaves (8 x 10)
- Patterned or textured paper for inner border (shown, purple mottled Paper
- Pizzazz from Hot Off The Press)
- Small and large heart punches
- PeelnStick foam squares (Therm O Web)
- Double stick adhesive or glue stick
- 1/8" round punch
- Deckle edge scissors
- Small calendar pages
- Embossing heat tool
General Instructions:
-
The size and shape of this card, the small calendar pages and the mosaic
squares are up to you. As shown, it is 8" x 10" with 1" x 1-1/2" calendar
pages and 1-inch mosaics.
-
For different events, select hole punch shapes other than hearts. For
example, make stars for graduation, hobby-related shapes for a retirement
card.
-
For long, narrow cards, stamp more than two butterflies. For easier mailing,
glue everything flat instead of having dimensional wings
-
Replace the butterflies with dolls, bugs, animals or fantasy figures.
-
Use Red Castle FREE Calendar Software to create calendar pages. This
software allows you to select a font style as well as a customized size and
shape. For easiest cutting, print outlines around the months. Hint: I made
a one-year calendar and discarded the months I didn't need instead of
printing each month on a separate page.
Instructions for the card shown:
-
With gold pigment ink stamp two pairs of butterfly wings and two bodies
(reddish brown card stock), leaving space between them. While ink is wet,
stamp Tactile Impressions lace pattern on all six pieces.
-
Emboss with gold powder. Cut out pieces.
-
Arrange two butterflies on black card stock. Position bodies at an angle and
lay wings flat to use for placement of antennae. Stamp and emboss antennae.
Remove the bodies and wings and set them aside. They will be glued in place
in step 9.
-
Layer black rectangle onto mottled blue/purple paper. Cut leaving 1/2"
border.
-
Layer, slightly above center, onto handmade paper with embedded leaves.
-
Stamp a large Tactile Impressions pattern onto gray card stock. Cut 8 or
more 1-inch mosaic squares. Arrange as shown and glue in place.
-
Add calendar pages and a hand-written or computer-generated message.
-
Punch a small heart. Punch 1/8" circle on the heart and glue to calendar so
the "important date" shows in the round opening. Punch large hearts and
scatter them on mosaic squares as shown. Use foam squares for dimension.
-
Lightly curl butterfly wings upward at ends. Arrange bodies and wings to get
accurate placement. Glue center of wings close together (wings have a small
tab that will be under the body piece). Glue bodies over these tabs, making
sure head touches antennae. Do not glue wings flat - allow them to flutter
and curl.
|
|
All brand names and product names are trademarks, registered trademarks
or trade names of their respective holders.